Teleprompter Lens Donuts and Light Seals: The DP Guide to Blocking Rear Flare on Camera
Master teleprompter lens donut selection, silicone gasket fitting, and hood light seals. Learn how to stop rear lens barrel light leaks, maintain sensor contrast, and drive clean remote takes.
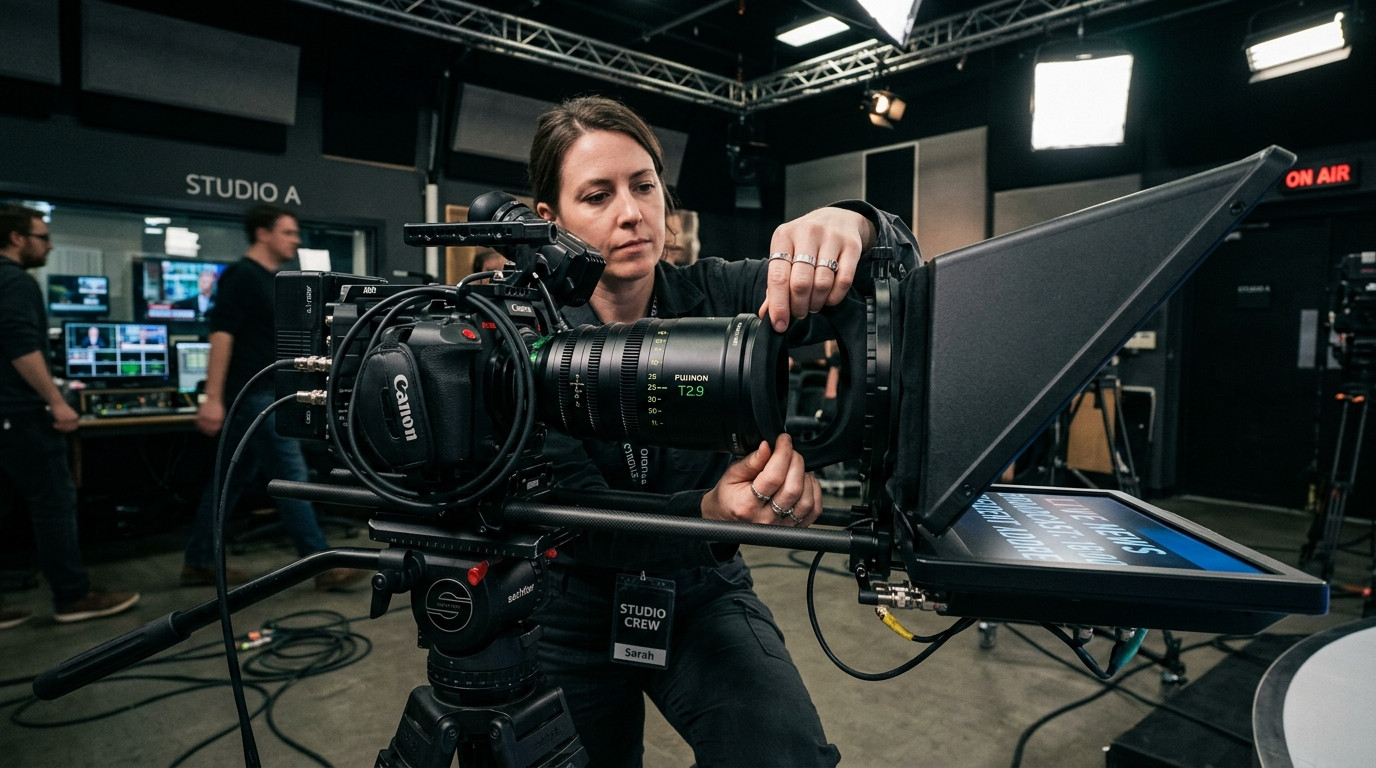
When you rig a beam-splitter teleprompter onto a studio camera, most attention gravitates toward the front: glass cleanliness, 70/30 optical transmission, and presenter eye line. Yet some of the most frustrating image degradation happens at the rear of the prompter hood. If ambient studio spill creeps between the lens barrel and the prompter backplate, light bounces off the rear surface of the beam-splitter mirror directly into your front lens element. The result is instant contrast wash, milky blacks, chromatic haze, and ghosted text reflections dancing across your camera sensor.
The Anatomy of Rear Light Leaks on Teleprompter Glass
A teleprompter hood is designed to create a dark optical tunnel between your camera lens and the angled beam-splitter glass. The front face of the 70/30 glass reflects the illuminated scrolling text toward your talent while passing 70 percent of incoming subject light straight through to the sensor. The back face of that glass sits inside the dark chamber of the hood.
When overhead grid lights, rim kickers, or bright white talent scripts illuminate the rear gap behind the hood, that stray light strikes the rear coated glass surface. Unlike standard lens hoods that simply shade direct light, a teleprompter housing contains two glass surfaces angled at 45 degrees. Any unsealed ray of light entering from behind creates a multi-bounce reflection between the teleprompter glass and your lens objective. Standard lens coatings cannot combat light arriving from inside an unsealed optical box. To keep your black levels rich and your sensor clean, you must achieve a light-tight interface using a proper lens donut or flexible gasket.
Choosing Between Lens Donuts, Silicone Bellows, and Fabric Knickers
Every camera build features different lens barrel diameters, focus throw extensions, and rig geometries. Selecting the right physical seal determines whether your setup stays light-tight or introduces mechanical binding during operation.
- Solid Foam and Neoprene Donuts: Precision die-cut foam rings that slip over the outer barrel of cinema primes or fixed-diameter lenses. They provide an airtight light seal and fit snugly into standard 114mm or 143mm teleprompter backplates. They are ideal when using cinema lenses with internal focusing where the front barrel never shifts.
- Flexible Silicone Stepped Rings: Molded stepped rings that snap securely into the prompter back ring and stretch over varying lens outer diameters (from 67mm to 95mm). They offer rapid lens swap speeds on corporate video shoots and commercial sets without needing multiple custom foam cutouts.
- Universal Fabric Hood Sleeves (Nun's Knickers): Elastic or drawstring fabric bellows that wrap around irregular lens bodies, zoom barrels, and matte box adapter rings. These are essential when shooting with expanding zoom lenses or vintage lenses where external focus rings rotate the physical barrel.
- Magnetic Quick-Fit Rings: Modern modular prompter setups use magnetic front filter threads that mate directly with a rear magnetic gasket on the teleprompter chassis, eliminating fabric gaps entirely for compact mirrorless and cinema camera rigs.
For high-pressure corporate sets and commercial shoots, such as those produced with Envy Creative, lighting setups change rapidly between executive interviews. If a key light or hair kicker shifts angle, an imperfect lens seal will immediately telegraph lens flare onto your monitor, turning an otherwise pristine take into a reshoot.
Preventing Lens Binding on Expanding and External Focus Barrels
Cinema glass features internal focus mechanisms where the physical length of the lens remains constant. Photo primes and hybrid video zooms, however, frequently feature telescoping barrels or rotating front elements. Forcing a rigid foam donut onto an external focus lens can burn out autofocus motors, jam manual focus gears, or pull the teleprompter chassis out of alignment on 15mm rails.
When working with telescoping lenses, set your focal length and calibrate your focus before cinching a flexible fabric sleeve. Leave enough slack in the bellow fabric so the barrel can travel freely across its entire focus throw without tugging against the prompter frame. If you must use a rigid foam donut, mount it behind the focus ring on the stationary portion of the lens barrel, ensuring that the prompter hood depth is adjusted forward so the moving glass element never collides with the inner lip of the ring.
Eliminating White Text Spill and Rear Reflection Ghosting
Even with an exterior light seal secured around the lens barrel, operators often notice a faint ghost of their script floating in dark areas of the video frame. This artifact occurs when the prompter monitor itself shines into the camera lens. While the black chassis of your teleprompter absorbs most stray luminance, the white or bright yellow lettering reflected on the 45-degree glass casts light downward and backward.
To stop text spill from contaminating your exposure, adjust your prompting software configuration to minimize excessive empty light. Traditional teleprompter setups forced operators to mirror displays through operating system inversion tools or HDMI reversal hardware, which often blew out margins and flooded the prompter hood with unneeded border glow. Using Prompter Share, operators can toggle hardware-free beam-splitter mirroring instantly using the M keyboard shortcut, keeping text crisp and tightly bound within readable margins.
Prompter Share runs a clean, high-contrast dark theme (#0B1416) that eliminates extraneous display glare while maximizing font readability. Because the software operates over a lightweight web connection with frame-accurate clock synchronization, you can trim your line width and increase line margins directly from your laptop. Narrower script margins prevent bright text from riding near the outer edges of the prompter hood where glass reflections can clip into the perimeter of your camera lens.
The Pre-Roll Light Seal Inspection Checklist
Before calling talent to set and rolling sound, conduct this five-step optical verification to confirm zero light leakage inside your teleprompter hood:
- Cap the Camera Lens: With the camera turned on and prompter mounted, put a front lens cap on or stop your iris down completely to f/22 with a heavy neutral density filter. Turn on camera zebra stripes or false color on your director monitor.
- Kill Studio Practical Lights: Turn on your high-output key, rim, and fill lights. Point a work light or mobile flashlight directly at the seam where the lens enters the backplate of the teleprompter hood.
- Check False Color and Waveforms: If your false color display registers anything above zero IRE or deep purple/blue, light is bypassing your lens donut. Adjust the seal until the waveform rests flat on the zero floor.
- Inspect White Script Glare: Scroll a block of text on the prompter monitor at maximum talent brightness while checking your viewfinder. Ensure no internal barrel reflections or ghosted letters appear inside the dark corners of the frame.
- Verify Rail Rig Rigidity: Loosen the tripod pan handle and tilt slightly. Ensure that the weight of the prompter hood and the tension of the donut do not exert downward torque on your lens mount.
When you need to adjust script speed or jump backward two lines during rehearsal without disturbing the physical camera rig, you can drive the take seamlessly from a laptop or mobile phone. By pairing a light-tight lens donut with a reliable browser-driven remote teleprompter from Prompter Share, your talent stays confident, your blacks stay deep, and your production team captures clean takes on every setup.