Teleprompter Microphone Placement: The DP and Sound Guide to Boom Geometry and Glass Reflections
Master teleprompter microphone placement on talking-head shoots. Learn how to position overhead boom mics, eliminate beam-splitter acoustic slapback, prevent mic shadows in key lights, and run silent remote prompting.
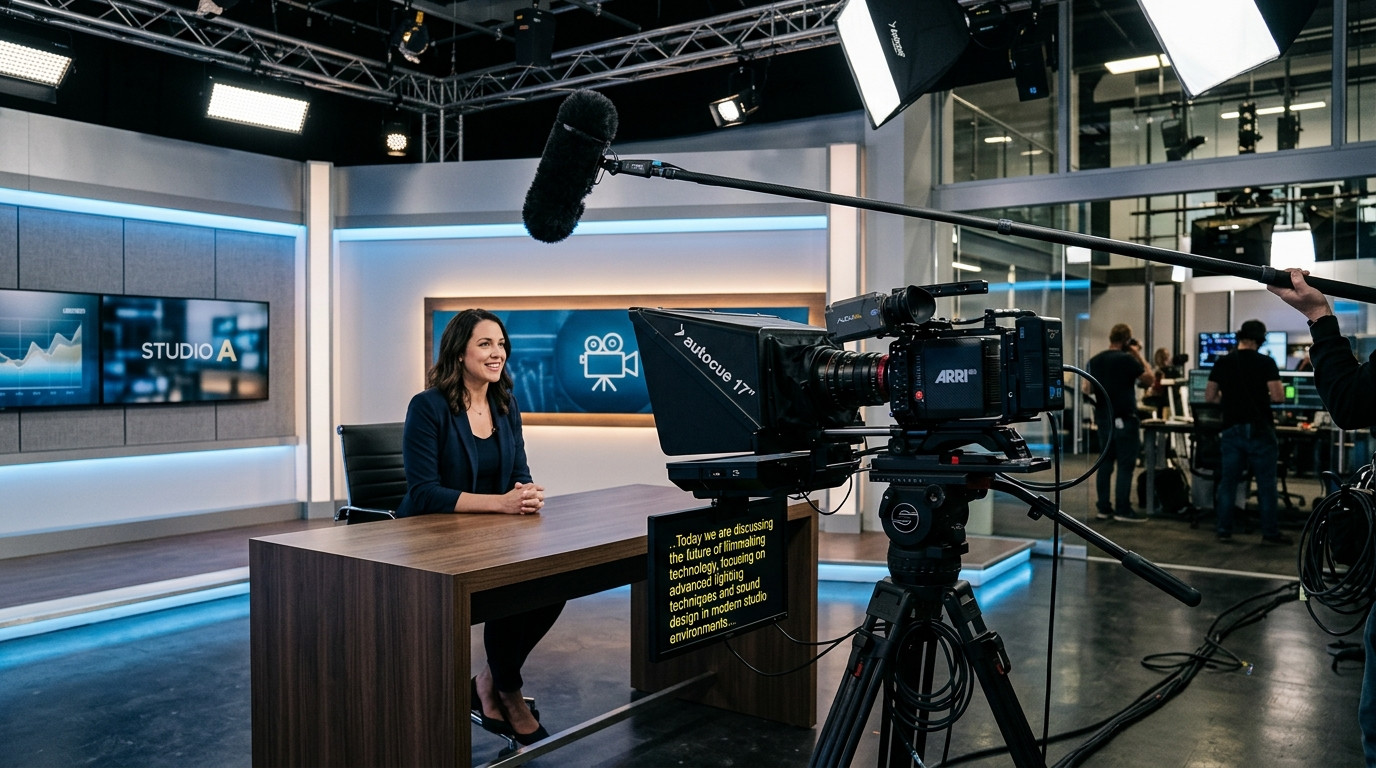
Mounting a 70/30 beam-splitter rig in front of your camera fundamentally changes the optical path, but it also alters the acoustics and lighting geometry of your studio set. A 14-inch sheet of angled optical glass sitting eighteen inches from your talent acts like an acoustic mirror. If you position an overhead shotgun or pencil condenser microphone carelessly, high-frequency vocal transients bounce directly off the hardened teleprompter glass back into the mic capsule, introducing comb filtering, phase cancellation, and hollow acoustic slapback.
At the same time, the physical bulk of the prompter hood, mounting sled, and glass frame creates a crowded target area right in front of your key light. Placing an overhead boom arm into that corridor frequently casts a hard microphone shadow across the talent forehead or onto the beam-splitter shroud itself. Solving these audio and lighting conflicts requires disciplined spatial geometry, correct microphone polar patterns, and a silent prompter workflow that does not produce mechanical clicks or computer fan noise.
The Acoustic Slapback Problem of Beam-Splitter Glass
Beam-splitter glass is dense, non-porous, and tilted at an exact 45-degree angle directly between the presenter mouth and the camera lens. When talent speaks, acoustic energy radiates outward in an expanding sphere. While lower vocal fundamentals wrap around objects, directional speech frequencies between 2 kHz and 8 kHz hit that flat glass surface and reflect upward and backward at a predictable angle of incidence.
If your boom microphone sits directly above the teleprompter frame pointing straight down toward the presenter chin, the capsule receives two distinct audio arrivals. The primary arrival is the direct vocal sound wave traveling straight from the speaker lips to the capsule. The secondary arrival is the reflected sound wave bouncing off the 45-degree angled glass surface a fraction of a millisecond later. When those two signals combine at the diaphragm, phase interference scoops out critical vocal presence frequencies, giving the voice a thin, nasal quality that EQ in post-production cannot repair.
Supercardioid Versus Shotgun: Selecting the Right Polar Pattern
The standard shotgun microphone with an interference tube design is often the wrong tool for an indoor teleprompter shoot. Shotgun microphones rely on phase cancellation slots along the barrel to reject off-axis sound. When sound reflections bounce off indoor studio surfaces or teleprompter glass into those side vents, the microphone internal acoustic maze produces comb filtering artifacts.
For small to medium studio spaces with beam-splitter rigs, a small-diaphragm condenser with a hypercardioid or supercardioid polar pattern yields far superior results. These capsules offer smooth off-axis rejection without an interference tube, making them far more forgiving when sound bounces off nearby glass. The rear rejection lobe of a hypercardioid capsule should be angled so its dead zone points directly at any hard reflective ceiling surfaces or nearby computer fans.
Boom Placement Geometry: The 45-Degree Overhead Rule
To eliminate acoustic reflections off the glass, move the boom capsule forward into the acoustic dead zone created by the glass tilt angle. When the glass tilts back 45 degrees toward the lens, reflections bounce upward toward the ceiling in front of the rig, rather than straight back at the talent.
- Keep the capsule forward: Position the microphone 16 to 24 inches from the talent mouth, placed just slightly ahead of their forehead rather than directly above the glass rig.
- Aim at the sternum: Point the microphone capsule toward the speaker chest or mouth at a 45-degree downward angle. This catches the natural vocal projection while placing the beam-splitter glass in the off-axis rejection zone of the capsule.
- Maintain safe frame clearance: Set your camera framing on your primary lens focal length before locking the boom stand. Keep the mic capsule three inches above the top edge of your frame line to preserve headroom while maximizing speech-to-noise ratio.
For complex shoots requiring total silence from the operator, running your script over a clean web setup like Prompter Share ensures zero fan noise or mechanical clatter near the microphone. The talent reads from an iPad or tablet mounted under the glass shroud while the operator drives the take remotely from another room or a laptop outside the audio zone.
Eliminating Boom Shadows from Key and Fill Lights
Microphone shadows appear on camera when the boom arm or shock mount intersects the direct beam of your key light. In typical corporate talking-head setups, a large softbox sits 45 degrees off camera axis and slightly above eye level. If you boom the microphone from the key light side of the set, the boom pole inevitably casts a dark diagonal shadow across the presenter chest, the background wall, or the top of the teleprompter hood.
Always rig your boom stand and c-stand arm from the fill side or opposite side of the key light. When the boom arm approaches talent from the shadow side of the face, any light shadow cast by the microphone falls away from the camera field of view. If low ceilings force the key light and the boom into tight quarters, raise the light diffusion frame higher and tilt the light downward, or add a solid black flag on a grip arm between the key light and the boom pole to shade the microphone hardware without cutting light from the presenter face.
Under-Booming: The Low-Profile Alternative for Tight Spaces
When shooting in low-ceiling office rooms or home studios, overhead booming can be physically impossible. The top of the beam-splitter glass frame may sit within inches of the ceiling tile, leaving zero clearance for a shock mount and windscreen.
Under-booming solves this spatial conflict cleanly. Position the boom pole below the bottom tray of the teleprompter, angling the microphone upward toward the speaker mouth at roughly 45 degrees. Because the microphone sits beneath the teleprompter sled, it stays completely clear of overhead key lights, completely eliminating boom shadows. Ensure you mount an effective foam windscreen or pop filter, as breathing out through the nose or pronouncing heavy plosives can cause air bursts into an upward-facing capsule.
Managing Secondary Audio Sources: Lavaliers and Boundary Mics
When talent moves frequently or an overhead boom is impractical, a professional broadcast lavalier microphone provides consistent proximity. Position the lavalier capsule four to six inches below the collarbone along the center of the chest. Avoid mounting the capsule directly underneath the chin, where head turns while reading long script lines can cause noticeable volume fluctuations.
For seated studio desks with integrated monitors, placing a small acoustic boundary foam pad or acoustic felt along the flat horizontal shelf of the teleprompter monitor sled dampens internal high-frequency rattles. Cheap plastic tablet mounts can resonate sympathetically with deep male voices; lining mounting trays with dense adhesive foam prevents micro-vibrations from traveling into camera-mounted microphones.
Zero-Noise Remote Control on Set
Every ambient noise during a take adds cleanup time in the edit suite. Keyboard clicking, mouse scrolling, and whispered direction beside the camera can easily bleed into sensitive condenser microphones. Using a modern remote prompter workflow removes physical operator presence from the immediate microphone pickup zone.
With Prompter Share, operators can control script scroll speeds, make instant text edits, and navigate cues from a laptop across the studio or over Wi-Fi without running noisy cables across the floor. If an operator or assistant must stand right at the tripod to adjust camera pan and tilt, they can control the script directly from a smartphone using the mobile remote link. This setup keeps the recording area completely silent, prevents screen sleep disruptions via integrated wake lock, and ensures every vocal take is clean, punchy, and clear of acoustic reflections.