Teleprompter Quick-Release Rigging: The DP Guide to Fast Camera Swaps and Rail Alignment
Master teleprompter quick-release baseplate systems, 15mm rod mounting, and optical centering. Learn how to swap cameras in seconds without dismantling beam-splitter glass, losing lens alignment, or tangling video cables.
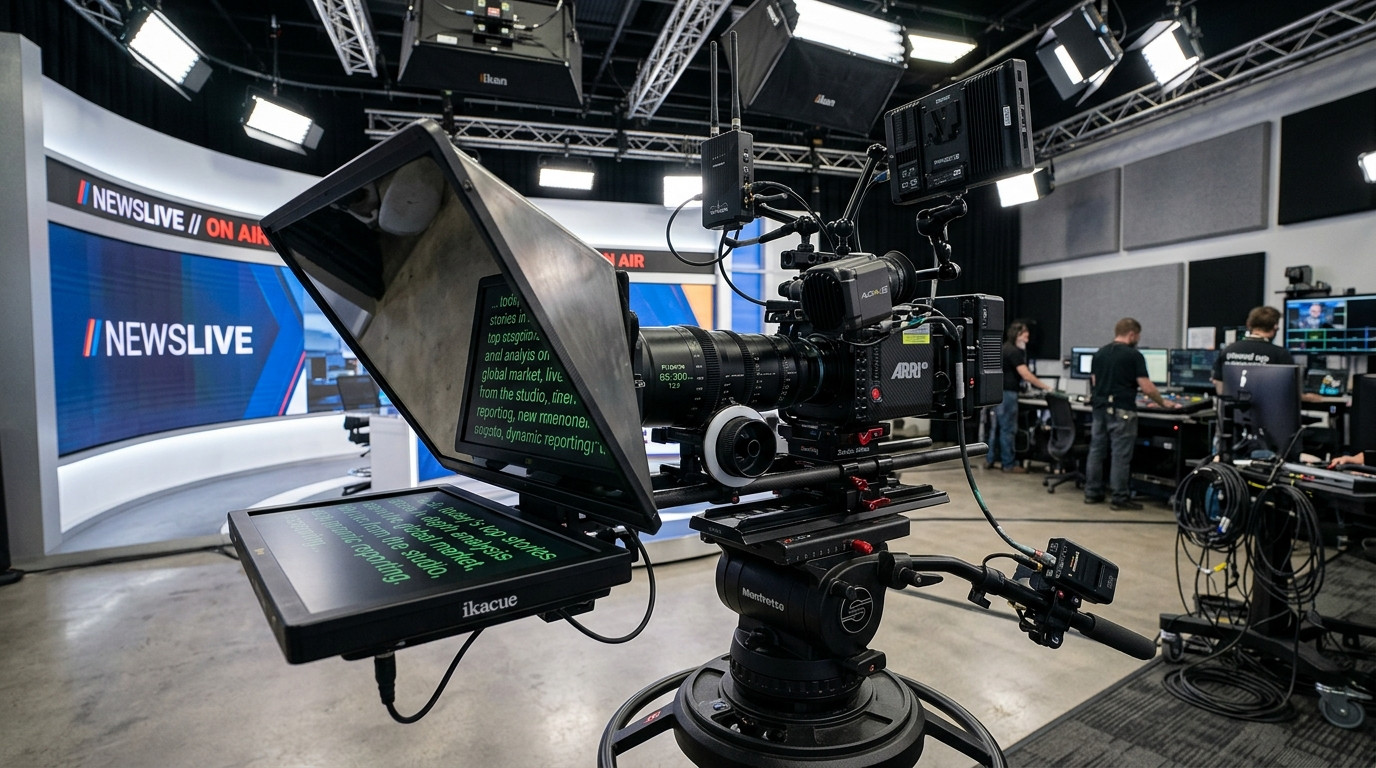
Few things slow down a commercial shoot or corporate video day faster than needing to rebuild a camera rig midway through a call sheet. If your A-camera is locked inside an enclosed teleprompter hood and you suddenly need to pull the body for a quick handheld insert or swap lenses across different front diameters, disassembling rail clamps and thumb screws burns precious minutes. Production momentum dies, talent loses rhythm, and your crew watches the clock tick.
Building a camera-to-prompter interface around a standardized quick-release ecosystem turns an awkward teardown into a five-second release. When paired with browser-based teleprompting that eliminates HDMI splitters and tethered monitor cords, your studio camera package transitions seamlessly between tripod prompting, slider moves, and mobile coverage.
The Core Problems with Direct-Threaded Prompter Mounts
Most entry-level teleprompters rely on a basic slotted cheese plate with 1/4-20 and 3/8-16 captive screws. Screwing a camera directly into a fixed sled introduces three recurring headaches on set:
- Optical Axis Drift: Every time you remove the camera to swap an internal battery or media card, re-tightening the base screw shifts the lens slightly off-center relative to the beam-splitter glass, resulting in frame vignetting or corner shadow cutoffs.
- Thread Wear and Sled Sag: Single-screw friction mounts inevitably work loose under pan-tilt momentum, causing the camera body to twist away from the prompter hood gasket.
- Rig Teardown Delays: Taking the camera off the tripod requires pulling the entire glass housing, monitor sled, and hood assembly apart as one unwieldy block.
A modular quick-release workflow decouples the teleprompter chassis from the camera payload. The glass housing and prompting display remain permanently balanced on the tripod fluid head, while the camera docks cleanly along calibrated 15mm rods.
Choosing Your Quick-Release Standard: Arca-Swiss, Manfrotto 501, or Touch-and-Go
Standardizing the mounting ecosystem across your entire camera package ensures universal interchangeability between teleprompter sleds, gimbals, shoulder rigs, and tripods. Three primary quick-release systems dominate professional sets:
- Arca-Swiss (Dovetail): The standard for compact mirrorless rigs, cinema boxes, and cage systems from brands like SmallRig and Wooden Camera. Precision dovetail clamps allow front-to-back sliding adjustments, giving operators exact optical alignment behind the teleprompter glass hood.
- Manfrotto 501PL / 504PL: Common across commercial video studios and documentary workflows. These long sliding plates offer ample fore-and-aft balance adjustment, ideal for heavier zoom lenses or camera bodies with rear V-mount batteries.
- Euro Touch-and-Go (Arri / Sachtler): The industry standard on broadcast stages and narrative sets. A drop-in wedge plate snaps instantly into the receiver and locks with a secondary safety lever, supporting heavy payloads without rotational play.
For most studio teleprompter builds, an Arca-Swiss receiver mounted on a height-adjustable 15mm rod riser provides the best combination of low profile clearance and micrometric lens height control.
Dialing in Lens Height and Center-Axis Alignment
Beam-splitter teleprompter glass operates at an exact 45-degree angle. If your camera lens enters the rear hood gasket too low, the bottom of the glass frame clips the bottom edge of your frame, forcing you into tighter focal lengths to avoid vignetting. If the lens sits too high, internal reflections bounce across the upper glass surface.
To establish perfect alignment, use an adjustable baseplate riser mounted to dual 15mm lightweight (LWS) rods. Set your camera on its quick-release plate, slide it into the receiver, and adjust the vertical riser until the center of the lens barrel aligns precisely with the optical crosshairs of the glass frame. Once dialed, lock the vertical riser collar with witness marks using silver gaffer tape or an oil-based marker. When you drop the camera back into the quick-release receiver on future shoot days, optical alignment returns immediately without guesswork.
Eliminating Cable Tangles with Browser-Based Prompting
Traditional teleprompter setups compound rigging friction by tethering the camera rig to an operator station with long HDMI, SDI, or USB video cables. Every time an operator shifts the tripod position or swaps cameras, stiff video lines snag on tripod adjustment knobs, introduce HDMI port torque, and create tripping hazards across the studio floor.
You can eliminate physical display cables entirely by moving your prompting workflow to the cloud. With Prompter Share, your prompter display runs inside any standard browser window on an iPad, tablet, or field monitor mounted to your rig. The operator drives, edits, and pauses the script from a laptop across the control room or halfway around the world, synchronizing text across screens in real time using frame-accurate clock sync.
Because the prompter screen operates over local Wi-Fi or cellular data, zero video tether cables connect your camera package to the control desk. Prompter Share includes a built-in display wake lock, guaranteeing that the talent viewer screen never dims or goes to sleep during long setup periods between takes.
The Two-Tier Balance Workflow: Prompter Sled vs. Camera Body
A stable teleprompter rig requires separate balance calibration for the chassis and the camera body. Follow this sequence when rigging your quick-release system:
- Step 1: Balance the Teleprompter Glass Sled: Mount the teleprompter frame, glass hood, and prompting monitor directly to your tripod head dovetail with no camera attached. Center the prompter sled so the tripod head does not pitch forward or backward under zero friction.
- Step 2: Mount the Quick-Release Receiver: Secure the quick-release receiver clamp to the prompter rear carriage sled or 15mm rods using dual screws to prevent torsional twisting.
- Step 3: Click the Camera Body into Place: Snap your rigged camera body into the receiver. Slide the quick-release plate forward or backward until the front element of the lens clears the silicone hood gasket without pressing against the beam-splitter glass.
- Step 4: Lock Tripod Counterbalance: Readjust the main tripod sliding plate to compensate for the camera payload, ensuring fluid pans and tilts remain feather-light throughout the shoot.
On-Set Rigging Shortcuts and Fluid Directing
When working with solo talent, multi-location executives, or tight studio crews, physical agility behind the camera matters as much as optical alignment. Using a teleprompter with built-in hardware-free mirroring means you never have to scramble with external flipping converters or reversed monitor menus. In Prompter Share, pressing the M key instantly flips text horizontally for 45-degree beam-splitter glass reflection while keeping the operator controller view clean and upright.
If you need to step away from the desk to adjust camera focus, set audio levels, or stand alongside talent to coach delivery, open the Prompter Share mobile remote link on your smartphone. You can play, pause, jump lines, and regulate scrolling speeds from your pocket while standing right beside the lens.
Standardize your teleprompter camera sled with a high-grade quick-release receiver, calibrate your 15mm rod height once, and run your script wirelessly through Prompter Share to keep your production moving at the speed of great takes.